Quick answer
Pakistan is on Amazon's approved seller list, so you can register with your own passport, an internationally chargeable card, receiving bank details from a provider such as Payoneer and a recent proof of address. Pick Individual ($0.99 per item) below 40 sales a month, otherwise Professional ($39.99 monthly). Matching names and addresses prevents most verification delays.
Key takeaways
- • Pakistan was added to Amazon's approved seller countries in May 2021, so you can register with Pakistani details.
- • Prepare a passport, an international card, receiving bank details and an address proof dated within 180 days.
- • The Individual plan costs $0.99 per item sold; Professional costs $39.99 a month and pays off above about 40 sales.
- • Most verification delays come from names, addresses or card holders that don't match across documents.
- • Many categories charge a 15% referral fee with a $0.30 minimum, before any FBA or shipping costs.
Table of contents 11 sections
- Can You Open an Amazon Seller Account From Pakistan?
- What Should You Prepare Before You Click Sign Up?
- Individual or Professional: Which Selling Plan Fits?
- Opening Your Amazon Seller Account, Step by Step
- Why Does Identity Verification Get Stuck?
- What Will Amazon Charge You on Each Sale?
- How Do You Get Sales Money Into a Pakistani Bank?
- Pakistani Paperwork Worth Sorting Early
- Habits That Keep a New Account Healthy
- Where PSTA's E-Commerce Course Picks Up
- Before You Register, Build One Document Folder
Here's an example of a pattern we see often with a first Amazon seller account. Hamza runs a small leather workshop near Sialkot and wants to sell wallets in the US. He signs up on a Friday night, uploads a blurry photo of his CNIC, types his address slightly differently from his bank statement, and spends the next three weeks stuck in verification. None of that delay was about his product. It was paperwork.
This guide covers the paperwork side of an Amazon seller account in Pakistan, done properly. Pakistan has been on Amazon's list of approved seller countries since May 2021, so you can register with Pakistani details. What slows people down is the order of things.
Here is what this guide covers:
- The documents Amazon asks for and how to prepare each one from Pakistan
- Whether the Individual or Professional plan suits your first year
- Each registration screen in Seller Central, in the order you'll see it
- Why verification gets stuck and how to avoid a rejection
- How sales money reaches a Pakistani bank account
Can You Open an Amazon Seller Account From Pakistan?
Yes, you can open an Amazon seller account in your own name. Before 2021, Pakistani sellers used workarounds: accounts opened in other countries, products sent to proxy addresses, and payment routes that were hard to bring home. Profit (Pakistan Today) reported on May 6, 2021 that Amazon had added Pakistan to its approved sellers list, and that accounts could now be made using Pakistani details.
That means you register as yourself. You choose Pakistan as your country, use your own ID and address, and later receive payments through a provider that works with Pakistani banks. You don't need a foreign company, a relative's address in Dubai or a borrowed identity. In fact, using someone else's details is the fastest way to lose an account.
One point people mix up: opening an account and shipping products are separate decisions. You can register first and decide later whether you will use Fulfillment by Amazon (FBA) or ship orders yourself.
What Should You Prepare Before You Click Sign Up?
Amazon's own "How to sell on Amazon" page lists what you need for the US store. Its FAQ also says you don't need a registered company to start. If you sell as a person, you pick "None, I am an individual" as your business type.
Here is that list, with notes on how each item works for someone living in Pakistan.
| What Amazon asks for | What it usually means in Pakistan | Common problem |
|---|---|---|
| Government-issued ID | Your passport is the safest choice; keep your CNIC ready as a second ID | Expired passport or a photo with glare |
| Internationally chargeable credit card | A card your bank has enabled for international online payments | Debit card blocked for foreign transactions by default |
| Bank account and routing number | Receiving details from a payment provider such as Payoneer | Name on the account differs from the ID |
| Proof of address from the last 180 days | A recent bank or credit card statement in your name | Address written differently on each document |
| Tax information | A tax information section inside Seller Central | Rushing through it and picking the wrong status |
| Phone number and email | A number that receives international SMS and a new email you check daily | Using a shared family number |
Spend an evening making these match before you start your Amazon seller account application. Write your address once, in one format, and copy it exactly into every form. "Mohallah", "Mohalla" and "Mohala" look the same to you, but a reviewer comparing documents may not read them that way.
Scan documents in color, at full size, with all four corners visible. A phone scanner app in good daylight works fine. Save each file with a clear name so you can upload it again quickly if Amazon asks.
Individual or Professional: Which Selling Plan Fits?
Amazon's pricing page shows two plans. On the Individual plan, Amazon takes $0.99 for every unit you sell. Professional is a flat $39.99 per month, regardless of volume. Both plans also pay selling fees on every order.
The break-even is simple arithmetic. $39.99 divided by $0.99 is about 40, so once you sell more than 40 items a month, Professional costs less. That matches Amazon's own advice that the Individual plan suits sellers moving fewer than 40 items a month.
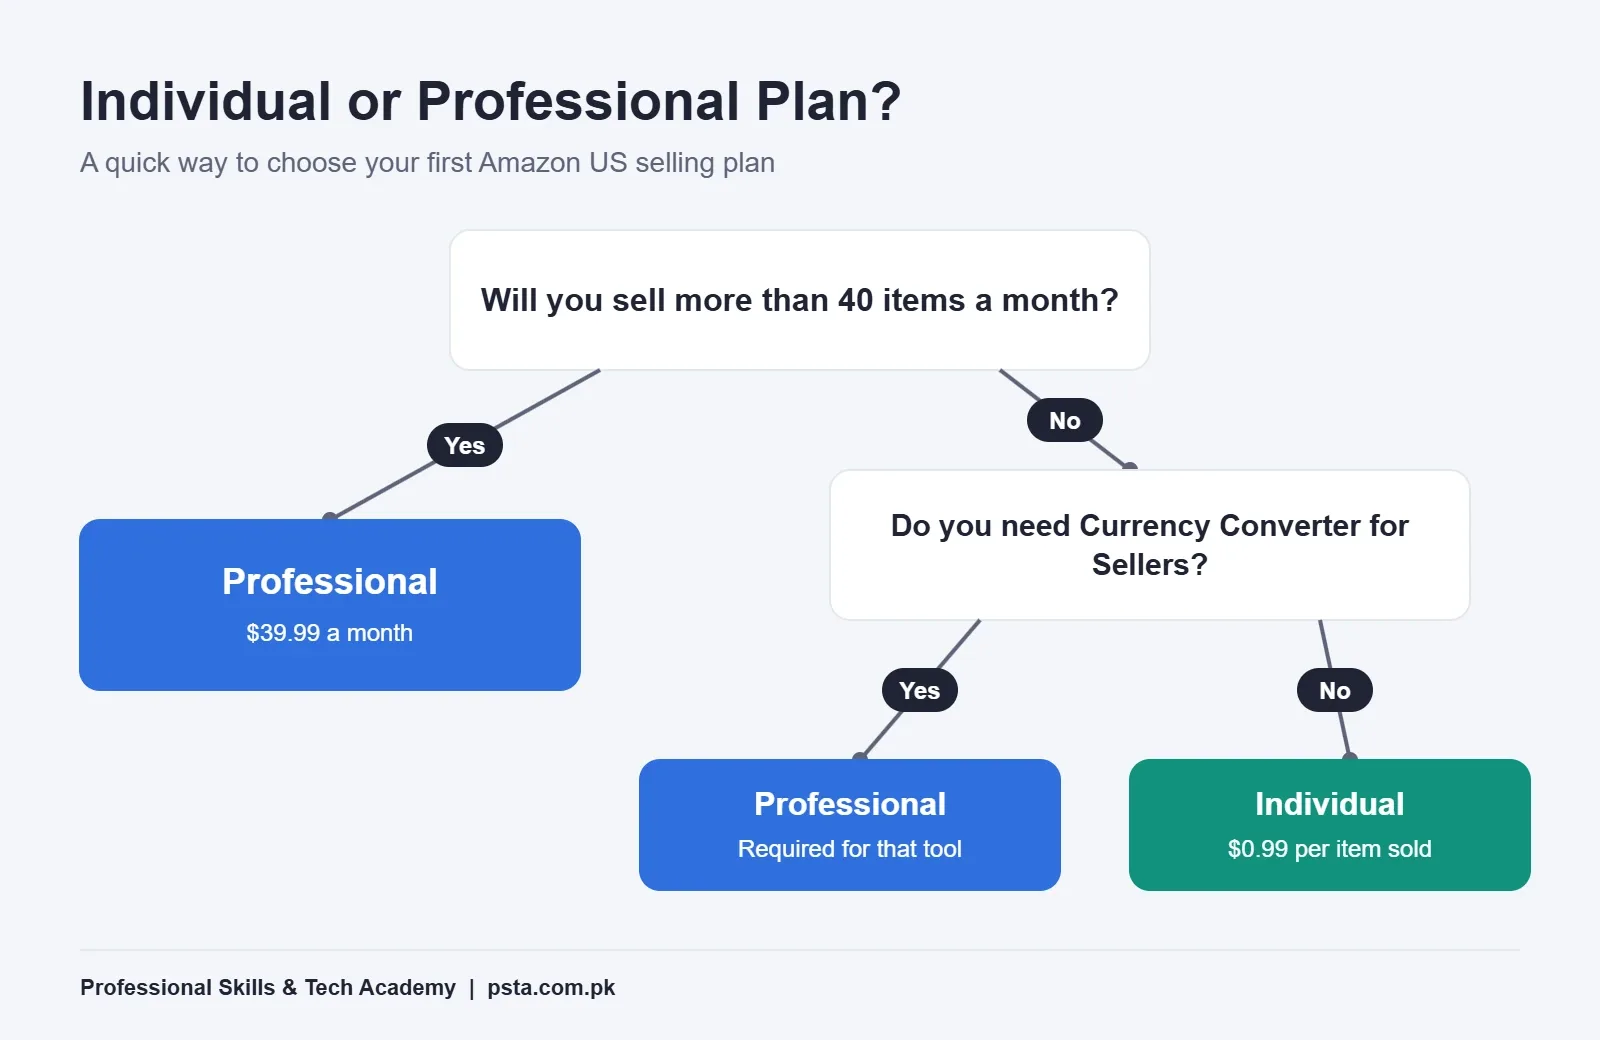
Price is only half the decision, though. Some tools you'll probably want are only on Professional. For example, Amazon says its Currency Converter for Sellers needs a Professional account. Check which tools you will need before choosing.
A practical rule we give students: if you are testing one or two products with a small budget, start on Individual and upgrade when sales justify it. If you have already sourced stock and plan to run ads from week one, start on Professional. Amazon also says the Professional subscription isn't charged until you list your first product, so registering early doesn't start the monthly bill.
Opening Your Amazon Seller Account, Step by Step
Amazon describes registration as six stages, with identity verification at the end. The screens change from time to time, but the order below has stayed stable. Keep your documents open in one folder before you begin, because hunting for files mid-form is where typos creep into an Amazon seller account application.
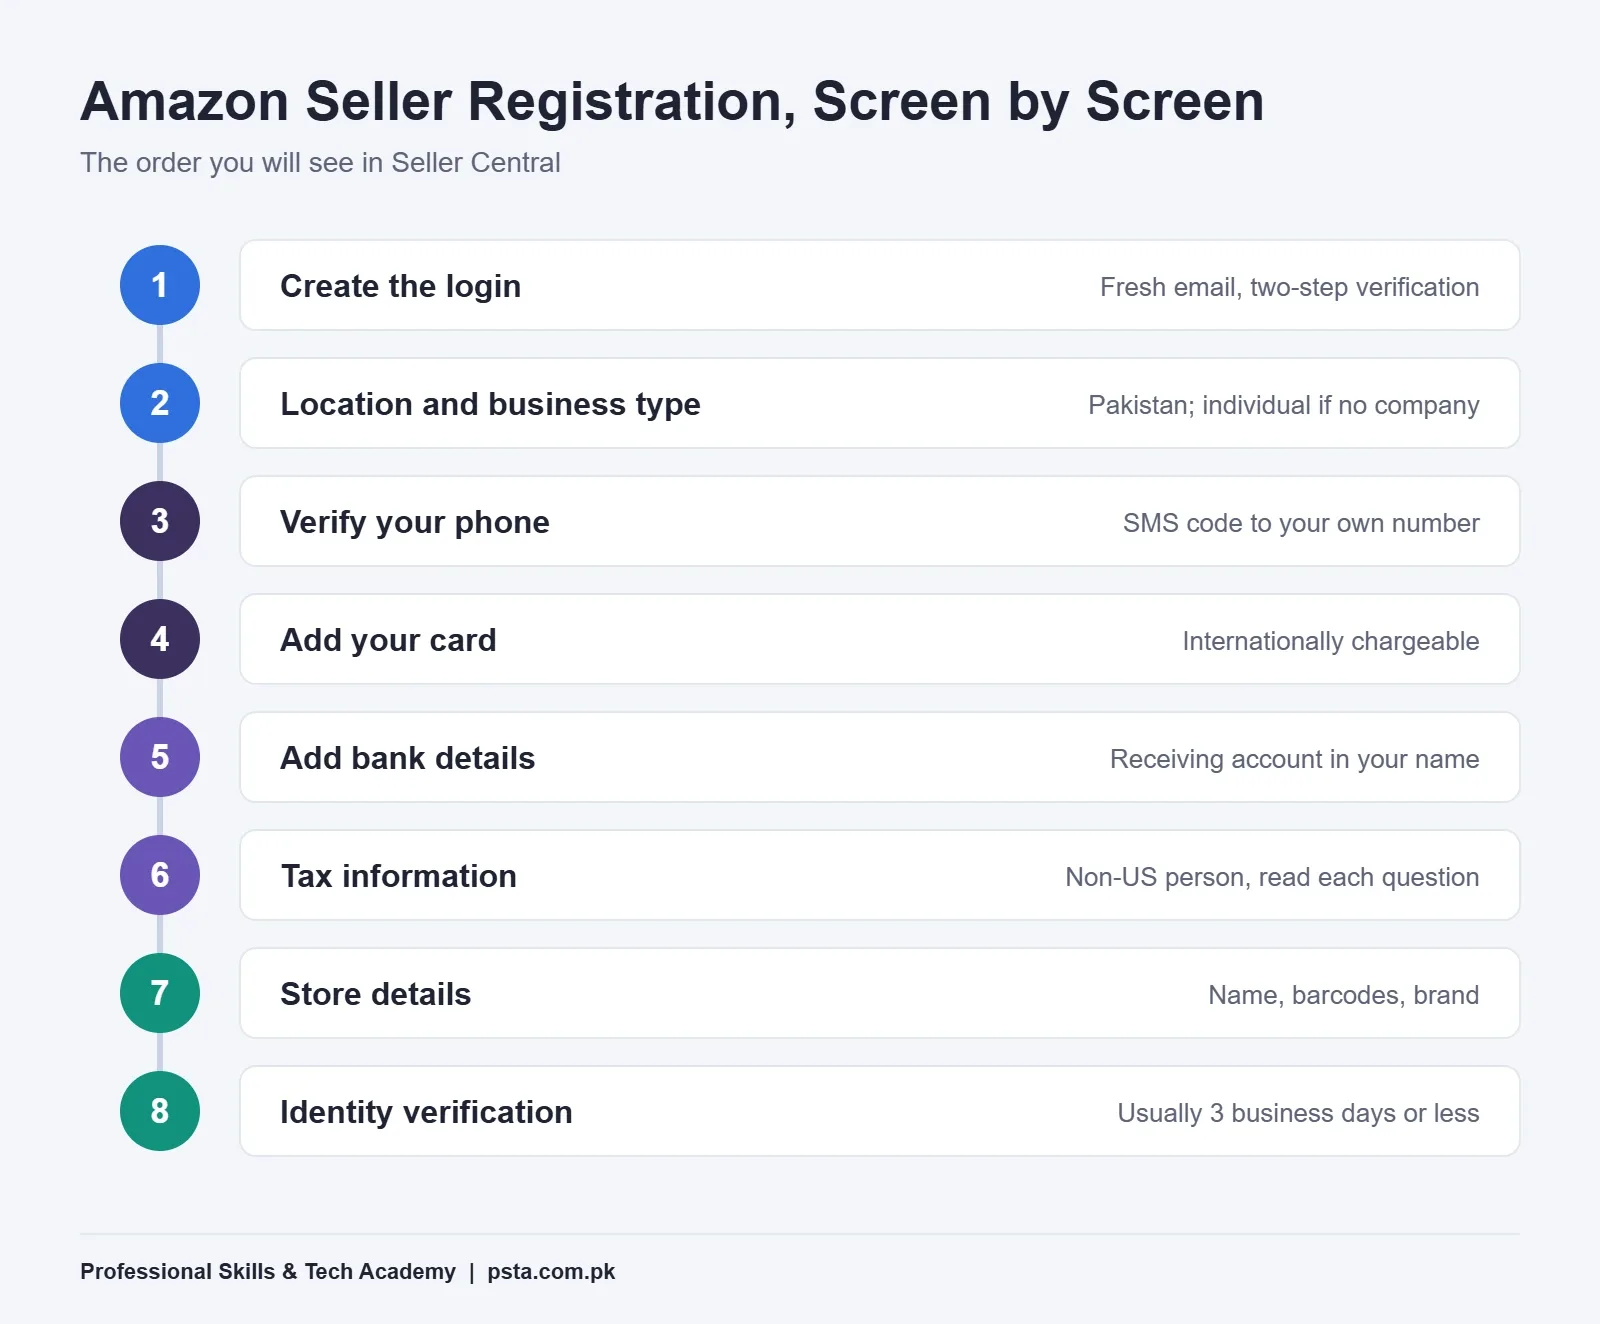
- Create the login. Use a fresh email address only for your store. Turn on two-step verification as soon as Amazon offers it.
- Choose your business location and type. Select Pakistan as the country. If you have no registered company, pick "None, I am an individual". Enter your name exactly as it is printed on your passport.
- Verify your phone. Amazon sends a code by SMS. A ProPakistani walkthrough from 2022 describes it as a 6-digit code. Use a number you control personally.
- Add your card. Enter the international card and its billing address. The billing address should match your proof of address.
- Add receiving bank details. Paste the account and routing number from your payment provider. Check the account holder name against your ID.
- Complete the tax information. Answer as a non-US person selling from Pakistan. Read each question; don't click through.
- Describe your store. Amazon asks for a store name and whether your products have barcodes (UPCs) and whether you own a brand or trademark. Answer honestly; you can update store details later.
- Finish identity verification. Upload your ID and proof of address, then follow any extra step Amazon requests.
The ProPakistani guide also mentions a postcard step, where Amazon mails a code to your address and delivery can take up to seven days. Not every applicant reports this, but if you get one, keep an eye on your post and don't move house mid-application.
Why Does Identity Verification Get Stuck?
According to Amazon's US selling page, identity verification usually takes three business days or less. When it drags on for weeks, the cause is almost always a mismatch the reviewer can't resolve.
The most frequent ones we see when helping students:
- Name order. Your passport says "Muhammad Hamza Khan" and your statement says "M. Hamza". Use the full passport spelling everywhere and get a statement that shows it.
- Old statement. Amazon wants proof of address from the last 180 days. A statement from last year won't pass.
- Cropped or edited images. Never crop out a corner or adjust text in an image editor. An edited document looks suspicious even when your intent was only to brighten it.
- Different card holder. A parent's card under your name creates a conflict. The card should be yours.
Amazon's stores in some regions also add a live step. Its European registration guide, for example, asks applicants to book a video call with an Amazon representative and show the same ID used at registration, plus proof of address. Treat that as a possibility for any store. Sit somewhere quiet, with good light and the original documents in your hand.
If Amazon asks for more information, reply once, with exactly what was requested. Sending five extra files that nobody asked for rarely helps.
What Will Amazon Charge You on Each Sale?
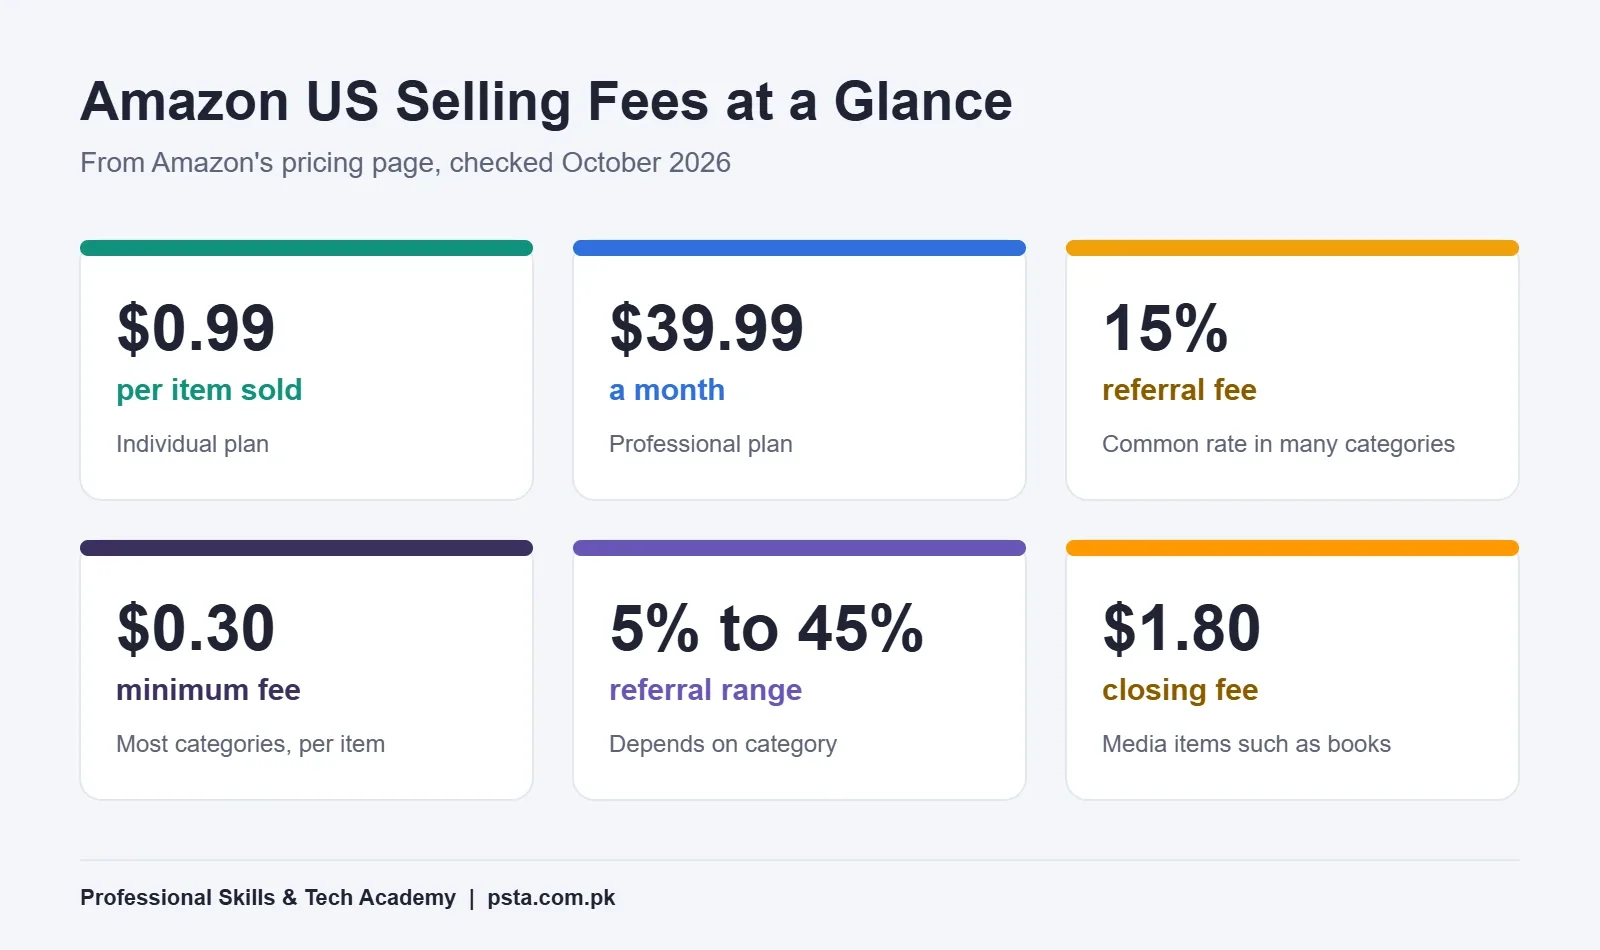
Beyond the plan fee, every order carries a referral fee. Amazon's pricing page explains that this fee is either a percentage of the sale price or a fixed minimum, and you pay the higher of the two. Many categories charge 15% with a $0.30 minimum. The full range runs from 5% in some low-priced clothing to 45% for Amazon device accessories. Media items such as books also carry a $1.80 closing fee.
Here is a worked example for one $20 item in a 15% category, before any FBA or shipping cost:
| Cost line | Individual plan | Professional plan |
|---|---|---|
| Referral fee (15% of $20) | $3.00 | $3.00 |
| Per-item plan fee | $0.99 | $0 (covered by $39.99 a month) |
| Amazon's share before fulfillment | $3.99 | $3.00 plus your share of the monthly fee |
Fulfillment costs come on top of this and depend on size and weight. Our earlier guide on how to calculate Amazon FBA fees walks through those numbers with a full product example. Run that calculation before you pay a supplier, not after the stock arrives.
How Do You Get Sales Money Into a Pakistani Bank?
Amazon pays out to the bank details you added during registration. For Pakistani sellers, those details usually come from a third-party payment provider. A July 2026 WorldFirst guide names Payoneer as one approved provider that issues receiving account details, and notes that conversion fees or exchange-rate spreads apply when you withdraw.
On the Pakistani end, Payoneer says its HBL partnership lets users link their Payoneer account inside the HBL mobile app and withdraw to rupees in real time. Other banks and providers work too; compare the total cost of a withdrawal, not only the advertised fee.
If you already freelance, the process will feel familiar. Our guide to Fiverr withdrawal in Pakistan explains how to compare withdrawal routes, and the same thinking applies to Amazon payouts.
Pakistani Paperwork Worth Sorting Early
Amazon doesn't need a Pakistani company from you, but your own records still matter. Foreign income that arrives in your account should match what you can show on paper. Three things help:
- Keep one bank account for store income. Mixing it with household spending makes later bookkeeping painful.
- Save every invoice. Supplier bills, shipping receipts and Amazon statements together tell the story of each rupee.
- Look into PSEB and FBR registration. Our PSEB registration guide covers how the process works for people earning from abroad. For your exact tax position, speak to a qualified tax adviser.
If you'd also like a local store alongside Amazon, the Shopify pre-launch checklist shows how selling inside Pakistan differs, especially with cash on delivery.
Habits That Keep a New Account Healthy
Approval of your Amazon seller account is only the start. These habits cost nothing and help you stay out of trouble in the first few months:
- Log in from the same laptop and network you used to register, at least at first.
- Keep one seller account per person. Don't open a second one "for backup".
- List products you can legally sell and that you can source with proper invoices.
- Reply to every Amazon message within a day or two, even if the reply is short.
- Read the policy page for your category before your first listing goes live.
None of this needs money. It needs patience, which is in shorter supply than capital for most new sellers.
Where PSTA's E-Commerce Course Picks Up
Registering takes a few evenings. Choosing a product, sourcing it and getting your first orders take much longer. That's where our e-commerce course on Amazon FBA, Shopify and dropshipping puts most of its hours.
The course is 12 weeks long and starts at beginner level. Its modules move from choosing a business model and hunting for products, through sourcing at home and abroad, to Amazon FBA (both private label and wholesale models), building Shopify and WooCommerce stores, running Facebook and Google Ads, and handling payments and logistics. The course page lists the fee as Rs. 25,000, reduced from Rs. 30,000.
Classes happen face to face in Mandian, Abbottabad (Old College Road, across from FIMS College), and live online for students elsewhere in Pakistan. A new batch starts every month. If you also want stronger ad skills, see our Social Media Marketing and Meta Ads course, or look through the full list of PSTA courses.
To enroll, the online admission form takes a couple of minutes to fill in. Questions about timings can go to us on WhatsApp at +92 314 5424399.
Before You Register, Build One Document Folder
Tonight, make a folder called "Amazon documents". Put in a color scan of your passport, a bank statement dated within 180 days and a note with your address written in one fixed format. Ask your bank whether your card is enabled for international online payments. When those four things are ready, opening the Amazon seller account itself becomes the easy part.
Frequently asked questions
Can I open an Amazon seller account with a CNIC instead of a passport?
Amazon asks for a government-issued ID, and a CNIC is one. Many sellers still prefer a passport because its English name and format are easier for an international reviewer to match against bank statements and card details. Whichever you choose, use the same document and the same name spelling throughout the application.
Do I need a registered company or NTN to sell on Amazon from Pakistan?
No company is needed to register. Amazon's US selling page says individuals can choose "None, I am an individual" as their business type. Separately, keeping clean records and looking into FBR and PSEB registration is sensible once foreign income starts arriving, and a tax adviser can confirm your own position.
Will a Pakistani debit card work for Amazon seller registration?
It can, if your bank has enabled it for international online transactions and it is a Visa or Mastercard in your own name. Many debit cards have this switched off by default. Call your bank or check its app before you start, and keep enough balance for the plan fee.
How long does Amazon seller verification take?
Amazon's US selling page says identity verification usually takes three business days or less. Applications with mismatched names, old address proofs or unclear scans can take much longer because Amazon asks for more documents. Preparing clean, matching files before you apply is the simplest way to stay inside that normal window.
Which Amazon marketplace should a Pakistani beginner start with?
Most beginners start with the US store because of its size and the amount of training material available for it. The right choice still depends on your product, shipping route and budget. You can begin with one marketplace and expand later once your first products sell steadily.
How do I receive Amazon payments in Pakistan?
You add receiving bank details during registration, usually from a provider such as Payoneer. Amazon pays into that account, and you then withdraw to a Pakistani bank. Payoneer's HBL integration, for example, lets users withdraw to rupees inside the HBL app. Compare conversion fees and exchange rates before choosing a route.
Is the Professional plan charged as soon as I register?
Amazon says the Professional subscription is waived until you list your first product, so registering early does not start the monthly $39.99 charge. Once a listing goes live, the monthly fee applies whether or not you make a sale, so list only when your product and pricing are ready.
Sources & references
- How to sell on Amazon sell.amazon.com
- Amazon selling fees and pricing sell.amazon.com
- Amazon Currency Converter for Sellers sell.amazon.com
- Amazon adds Pakistan to approved sellers list (Profit) profit.pakistantoday.com.pk
- How to open an Amazon seller's account in Pakistan (ProPakistani) propakistani.pk
- Amazon seller registration guide (Europe) sell.amazon.de
- Amazon seller payment methods in Pakistan (WorldFirst) worldfirst.com
- Payoneer and HBL real-time withdrawals blog.payoneer.com
Last reviewed & updated on by Umar Qureshi. Written by the PSTA team in Abbottabad, Pakistan.

Umar Qureshi

Master E-Commerce & Build Your Online Empire: Amazon FBA, Shopify & Dropshipping
Turn this guide into a career: hands-on training with real projects, online across Pakistan or on-campus in Abbottabad · 12 Weeks.
Comments
No comments yet — ask a question or share your experience.