Quick answer
Begin with Photoshop's Remove Background quick action and inspect the edges at full zoom. Move to Select and Mask for hair, the Object Selection tool for crowded shots, and the Pen tool for hard product outlines. Work on layer masks, then deliver either a transparent PNG or a pure white version, depending on the platform.
Key takeaways
- • The Remove Background quick action in the Properties panel creates a layer mask, so nothing is erased
- • Select Subject plus Select and Mask gives you more control over hair, fur and fabric edges
- • The Pen tool gives the cleanest outline on bottles, boxes, phones and shoes
- • Layer masks hide pixels instead of deleting them, so you can fix client revisions later
- • An Amazon staff reply lists pure white RGB 255, 255, 255 for main images, while Shopify names PNG as its preferred product image format
Table of contents 16 sections
- Which Method Should You Use First?
- Method 1: The Remove Background Quick Action
- Method 2: Select Subject Plus Select and Mask
- Make the First Selection
- Clean the Edge in Select and Mask
- Method 3: The Object Selection Tool for Busy Photos
- Method 4: The Pen Tool for Hard Product Edges
- Method 5: The Background Eraser Tool
- How Do You Refine Hair and Soft Edges?
- Layer Masks or Deleting Pixels: Which Is Safer?
- After You Remove Background in Photoshop: Export for Marketplaces
- When to Send a Transparent PNG
- When to Send a White Background
- What Goes Wrong Most Often, and How Do You Fix It?
- Where Photoshop Fits in PSTA's Graphic Designing Course
- A Practice Set to Try Before Your Next Order
Which tool should you pick up first when you need to remove background in Photoshop for a Daraz listing or a Fiverr order? For most product photos, start with the one-click Remove Background action, zoom in on the edges, and switch to a manual method only where the automatic result fails. Whatever you use, keep the cutout on a layer mask so you can repair mistakes later.
- Five methods, each matched to the kind of photo it handles well
- Clear numbered steps with the real Photoshop menu names
- A simple way to clean up hair, fur and soft fabric edges
- Why masking beats deleting when a client asks for changes
- What Amazon and Shopify say about product image backgrounds and sizes
Which Method Should You Use First?
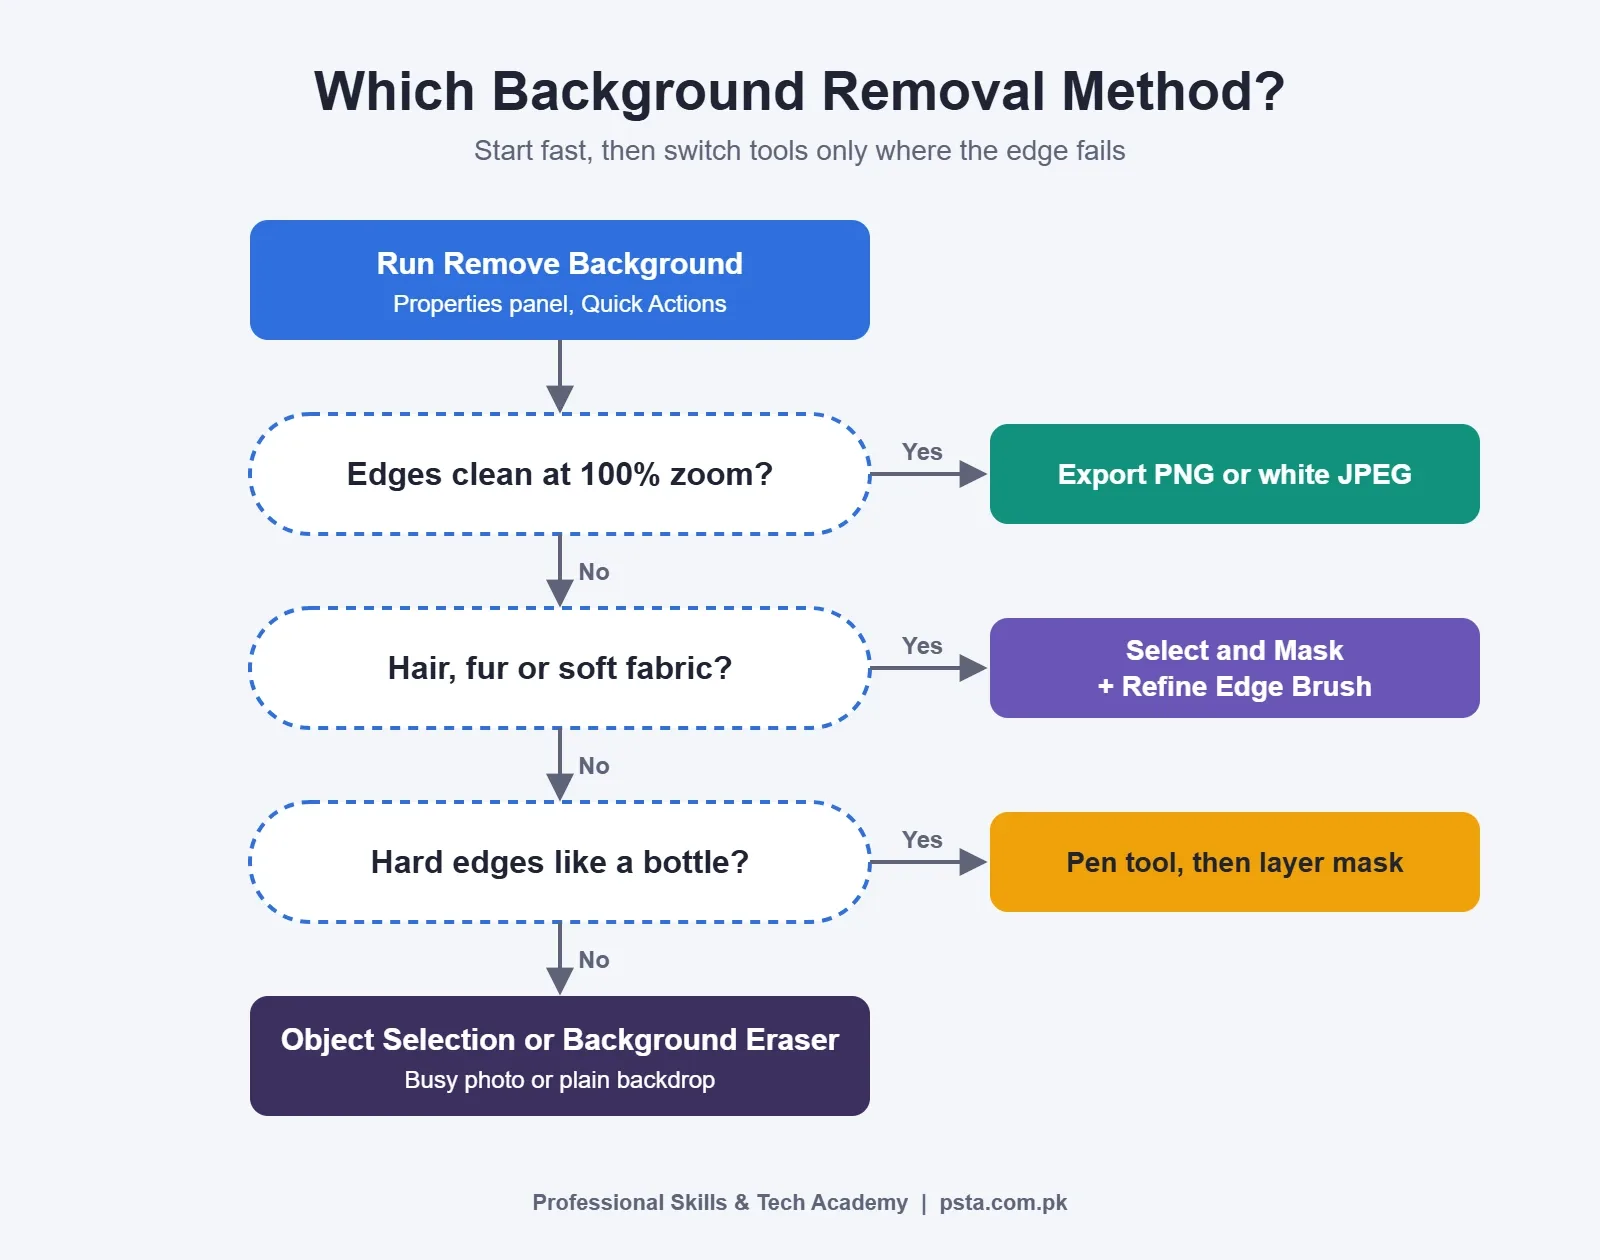
There is no single best tool. The right choice depends on the photo in front of you. A bottle on a plain table is easy. A model with loose hair on a busy street is hard. A shoe with a crisp, hard outline needs a very clean edge.
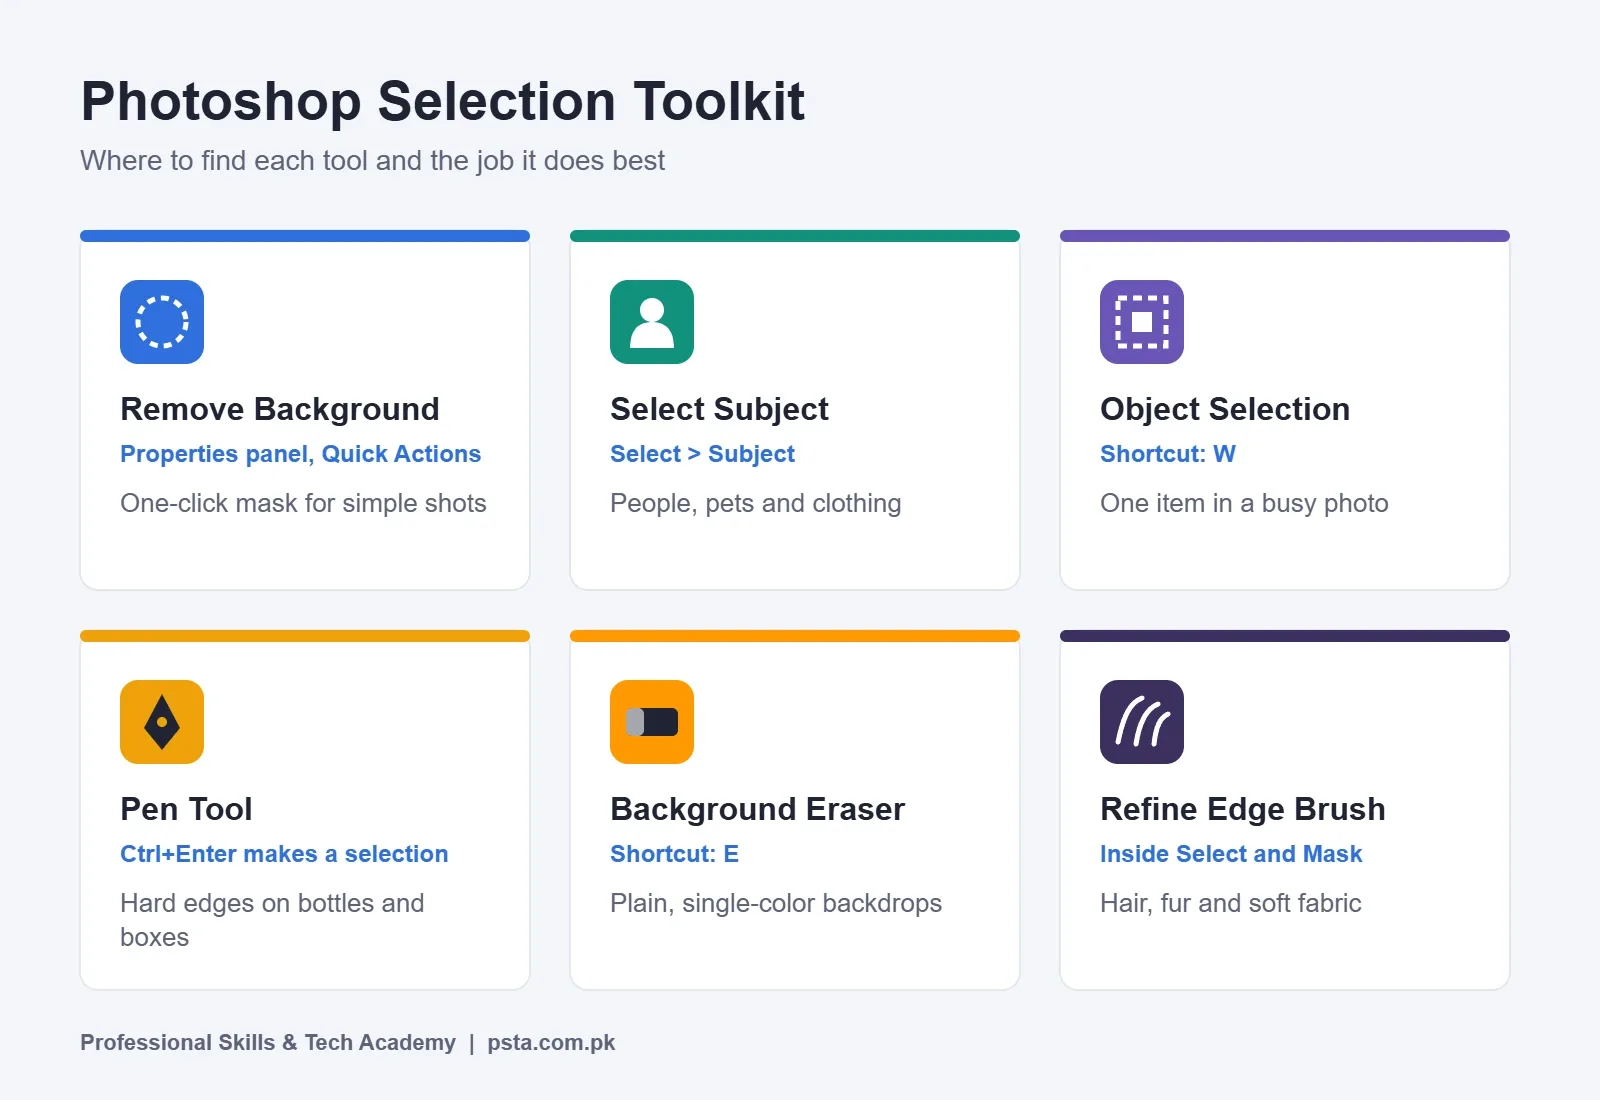
Ask yourself two short questions before you click anything. Is the background plain or busy? Are the edges hard, like glass and plastic, or soft, like hair and wool? The table below sums up how each method fits.
| Method | Best For | Speed | Edge Quality |
|---|---|---|---|
| Remove Background quick action | Clear subject, simple background | Fastest | Good, needs a check |
| Select Subject plus Select and Mask | People, pets, hair, fur | Fast | Very good after refining |
| Object Selection tool | One item among many in a busy photo | Fast | Good |
| Pen tool | Bottles, boxes, phones, shoes | Slow | Sharpest on hard edges |
| Background Eraser tool | Even, single-color backgrounds | Medium | Varies, edits pixels directly |
A good habit is to try the fastest option first. If the edge looks clean at 100% zoom, you are done. If not, move down the list.
Method 1: The Remove Background Quick Action
This is the quickest way to remove background in Photoshop. According to Adobe's remove background guide, the command builds a selection around your subject and turns it into a layer mask. That means nothing gets erased.
- Open your product photo. In the Layers panel, make sure the layer is not locked.
- Go to the Properties panel and find the Quick Actions section.
- Click Remove Background. You can also use the same option in the Contextual Task Bar that floats near your image.
- If you cannot see the button, Adobe suggests clicking the plus icon in Quick Actions and searching for it.
- Zoom in and check the edges. Paint with a white brush on the mask to bring back missing parts, or a black brush to hide leftover background.
Adobe also recommends checking fine areas like fur or hair with the Refine Edge Brush. We cover that a little later.
Method 2: Select Subject Plus Select and Mask
If you want more control when you remove background in Photoshop, Select Subject is the next step up. It gives you a selection rather than a finished mask. That extra step lets you refine the edge before you commit. It works well for portraits, pets and clothing photos.
Make the First Selection
Adobe's Select Subject tutorial lists two ways to start.
- Pick the Quick Selection tool or the Magic Wand tool in the Tools panel.
- Click Select Subject in the Options bar, or choose Select > Subject from the menu.
- Fix small misses with the Add to selection and Subtract from selection options.
Clean the Edge in Select and Mask
Next, choose Select > Select and Mask. The Adobe help page on precise selections explains the main controls.
- Pick a view from the View menu. Overlay shows unselected areas in red, so gaps are easy to spot.
- Use the tools on the left: Quick Selection, Refine Edge Brush, Brush, Lasso and Polygonal Lasso.
- In the Properties panel on the right, adjust Smooth for jagged lines and Contrast for crisper edges.
- Open Output To and choose New layer with layer mask.
- Click OK to return to your normal workspace.
Choosing a layer mask output keeps your original pixels safe. You can always reopen the mask and keep working.
Method 3: The Object Selection Tool for Busy Photos
Sometimes a client sends one photo with several products on a shelf. You only need one of them. This is where the Object Selection tool helps you remove background in Photoshop around one item, because you can point at it directly.
- Press W or pick the Object Selection tool from the Tools panel.
- Move your cursor over the product. Photoshop highlights the object it detects.
- Click to turn that highlight into a selection.
- Open Select and Mask to clean up the edge, then output to a layer mask.
For people, the options bar also has a Select people menu. It can pick a whole person or a detail such as hair or clothes. That is handy for fashion sellers who want to change only part of a photo.
Method 4: The Pen Tool for Hard Product Edges
Automatic tools can leave soft, wobbly lines on glass, metal and plastic. Many marketplace buyers zoom in, so a clean edge matters when you remove background in Photoshop for a listing. The Photoshop Pen tool draws a smooth vector path that you control point by point.
Here is the basic flow from Adobe's Pen tool page.
- Choose the Pen tool and click to place anchor points along the product's outline.
- Close the path by clicking back on your first point.
- In the Paths panel, double-click Work Path and give it a name so it is saved.
- Press Ctrl+Enter on Windows or Command+Return on Mac to load the path as a selection.
- Click the Add layer mask button in the Layers panel to hide the background.
The Pen tool is slow at first. With practice it becomes the tool you trust most for packaging and electronics.
Method 5: The Background Eraser Tool
The Background Eraser tool samples a color and erases matching pixels as you drag. It is one of the older ways to remove background in Photoshop, and it suits photos shot on a plain sheet or wall. Keep in mind that it removes pixels for good, so work on a duplicate layer.
The Adobe Background Eraser help page gives these steps.
- Press E, or press and hold the Eraser tool and choose Background Eraser from the group.
- In the options bar, set brush size, hardness and spacing.
- Set Sampling, Limits and Tolerance. Start with a low tolerance and raise it only if needed.
- Turn on Protect Foreground Color to guard a color you want to keep.
- Place the crosshair in the middle of the cursor on the background color.
- Click and drag along the edge, keeping the crosshair off the product.
The background eraser tool is useful for quick fixes. For client work you may need to revise later, a mask is safer.
How Do You Refine Hair and Soft Edges?
Hair, fur, scarves and fluffy toys are where most attempts to remove background in Photoshop fall short. The fix is patient brushing inside Select and Mask. Adobe's tutorials describe a simple routine.
- Make a rough selection of the body, and leave the loose strands outside it.
- Open Select and Mask and switch the view to Onion Skin. Lower or raise Transparency until the edge is clear.
- Choose the Refine Edge Brush and paint along the hairline. Loose strands join the selection as you brush.
- Switch to Overlay. Red areas show what is still unselected.
- Brush over any missed areas with the Quick Selection tool.
- If you see a halo of the old background color, tick Decontaminate Colors and adjust its Amount slider.
- Output to a layer mask and click OK.
Adobe's help center also has a page on a Refine Hair tool inside the same workspace. Try it when your version shows it. Even then, expect to touch up a few strands by hand.
Layer Masks or Deleting Pixels: Which Is Safer?
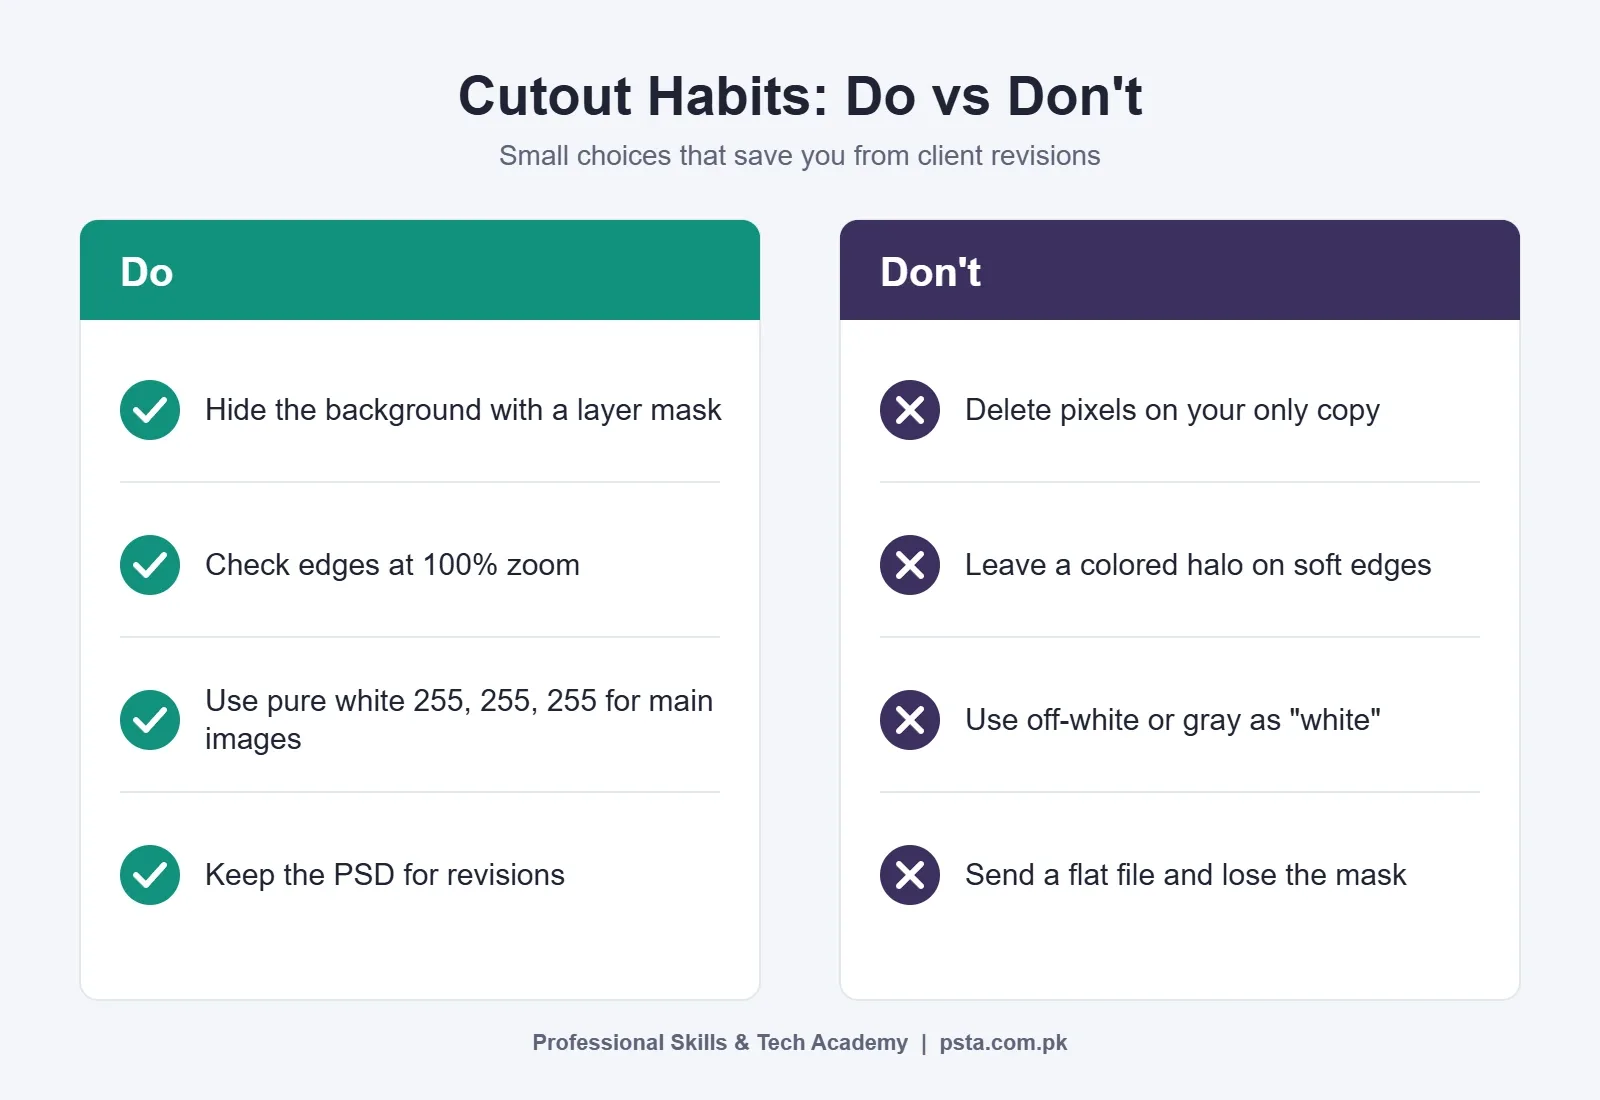
When you delete background pixels, they are gone. When you use a layer mask, they are only hidden. That small difference saves hours when a client later asks you to bring back a shadow or a strap.
Adobe's layer mask tutorial explains how this works.
- Select your layer and click Add layer mask at the bottom of the Layers panel.
- Click the mask thumbnail so it is active.
- Press D to reset colors to black and white, then X to swap them.
- Paint black to hide parts of the photo and white to reveal them again.
- A soft brush gives gray, which partly hides an area and creates a gentle edge.
So each time you remove background in Photoshop for a client, mask first and decide later. Adobe advises saving your working file as PSD or TIFF so the masks stay editable. Send the client a flat export, and keep the PSD in your project folder.
After You Remove Background in Photoshop: Export for Marketplaces
Once you remove background in Photoshop, you have two delivery choices. You can export a transparent PNG, or you can place the product on pure white. Which one you send depends on where the image will live.
When to Send a Transparent PNG
A transparent PNG works well for website banners, social posts and mockups. The designer or store owner can drop it on any color. Shopify's help center on product media names PNG as the best format for most product images, followed by JPEG. It also suggests 2048 x 2048 pixels for square images and keeps files under 20 MB.
When to Send a White Background
Marketplaces often want a plain white main image. In a staff reply on Amazon's Seller Forums, Amazon listed a pure white background (RGB 255, 255, 255) for main images. The same reply said the product should fill at least 85% of the frame, with 1,000 pixels or more on the height or width recommended.
To make a white background for product photos, follow these steps.
- Keep your masked product layer as it is.
- Add a new layer below it and fill it with pure white.
- Double-check that the fill color reads 255, 255, 255 in RGB, not an off-white.
- Crop to a square and scale the product so it fills most of the frame.
- Export a JPEG or PNG copy at the size your platform asks for.
For Daraz, check the current image rules inside your Daraz Seller Center before you deliver, since rules can change. Our guide on how to sell on Daraz covers the wider listing process. Adobe also has a Quick Export as option for saving a copy fast in your chosen format.
What Goes Wrong Most Often, and How Do You Fix It?
Every beginner who learns to remove background in Photoshop runs into the same handful of problems. Here are the ones students bring to class most often, with a calm fix for each.
- A thin colored halo around the product. Reopen the mask in Select and Mask and try Decontaminate Colors.
- The cutout looks jagged. Raise Smooth slightly in Select and Mask, or redraw the edge with the Pen tool.
- Part of the product vanished. Select the mask and paint white over the missing area.
- Remove Background does not work on your file. Check that the layer is not locked first, since Adobe's steps start there.
- The PNG shows a white box instead of transparency. Make sure you hid or removed any white fill layer before exporting.
- Colors look different online. Product photos for screens should stay in RGB. Our RGB vs CMYK guide explains why.
Before you deliver, view each image at 100% zoom on both a white and a dark background. Problems hide on one and show up on the other.
Where Photoshop Fits in PSTA's Graphic Designing Course
If you want guided practice, the Graphic Designing Course at PSTA spends its second week on Adobe Photoshop, including image editing, retouching and banners. That is where you practice how to remove background in Photoshop on real product shots with feedback.
The 12-week beginner course also covers Illustrator, CorelDRAW, Canva, InPage Urdu posters and AI tools such as Adobe Firefly. You finish by building a portfolio for Behance and Fiverr. The fee is Rs. 18,000, payable in two installments, and the course is taught by Umar Qureshi.
If your clients are online sellers, the E-Commerce course shows the selling side of Amazon and Shopify. If you want to move into product videos, look at the Video Editing course. New to design apps altogether? Read our overview of graphic design software for beginners first.
Classes happen face to face at the Abbottabad campus near FIMS College, live over the internet for students in other cities, or as a blend of both. A fresh intake starts each month, and slots cover mornings, afternoons, evenings and weekends from Monday to Saturday. Compare programs on the courses page, apply through admission, or send a quick message on WhatsApp to confirm a timing that suits you.
A Practice Set to Try Before Your Next Order
Take three photos from your phone: a bottle, a shoe and a person with loose hair. Remove the background from each using a different method from this guide. Export the bottle on pure white, the shoe as a transparent PNG and the portrait with a layer mask still editable. Compare the edges side by side. That one exercise will show you which method you should trust for each kind of client photo.
Frequently asked questions
Do I need the latest Photoshop version to follow these steps?
The quick action and Select Subject are features of recent desktop versions, so an older copy may not show them in the same place. The Pen tool, layer masks and the Background Eraser have been part of Photoshop for a long time. If a button is missing, compare your version with the current Adobe Help Center page before assuming you did something wrong.
Can I remove a background in Photoshop on the web?
Yes. Adobe's help page for Photoshop on the web describes uploading an image, opening Quick actions and choosing Remove background in the Background section. It is a handy option on a lower-powered laptop, though the desktop app gives you more control over edges through Select and Mask and the Pen tool.
Why does my cutout have a faint colored outline?
That outline is usually leftover color from the old background clinging to soft edges. Open the mask again in Select and Mask and turn on Decontaminate Colors, then adjust the Amount slider. For hard objects, redraw the problem part of the edge with the Pen tool and apply it as a mask instead.
Should I send clients a PSD or a PNG?
Send whatever the brief asks for, and agree on it before you start. Many marketplace clients only need flat JPEG or PNG files sized for their store. Agencies and designers often want the layered PSD so they can adjust the mask. Keep your own PSD either way, because revisions are far quicker when the mask is still editable.
Is a transparent PNG accepted as a marketplace main image?
Rules differ by platform, so check the current seller help pages each time. An Amazon staff reply on its Seller Forums points to a pure white background for main images, which means a transparent file may not meet that rule. A safer habit is to deliver a white-background version for listings and a transparent version for banners or ads.
How long does it take a beginner to get fast at background removal?
Speed comes from repetition rather than a set number of days. Practice the same five methods on different kinds of photos, such as bottles, shoes and people. Time yourself on each image and note which method gave the cleanest edge. After a few dozen images you will start choosing the right tool without thinking about it.
Can AI tools replace learning manual selection?
Automatic tools handle many simple product shots well, and they are worth using first. They still struggle with glass, fine hair, matching colors and cluttered scenes. Knowing the Pen tool and Select and Mask lets you fix those weak spots instead of sending a client a flawed image. Paying clients often notice that difference.
Sources & references
- Remove a background in Photoshop (Adobe) adobe.com
- Select a subject with one click (Adobe Help Center) helpx.adobe.com
- Make precise selections in Select and Mask (Adobe Help Center) helpx.adobe.com
- Work with the Background Eraser tool (Adobe Help Center) helpx.adobe.com
- Layer mask basics (Adobe Help Center) helpx.adobe.com
- Pen tool in Photoshop (Adobe) adobe.com
- Product media types (Shopify Help Center) help.shopify.com
- Main image requirements, Amazon staff reply (Amazon Seller Forums) sellercentral.amazon.com
Last reviewed & updated on by Umar Qureshi. Written by the PSTA team in Abbottabad, Pakistan.

Umar Qureshi

Ultimate Graphic Designing Course in Pakistan: Master Photoshop, Illustrator, CorelDRAW & AI Tools (Practical & Beginner Friendly)
Turn this guide into a career: hands-on training with real projects, online across Pakistan or on-campus in Abbottabad · 12 Weeks.


Comments
No comments yet — ask a question or share your experience.