Quick answer
Record a short noise sample, duplicate your clip, then run one speech-cleaning tool at moderate strength: Premiere Pro's Enhance Speech, Audacity's Noise Reduction, DaVinci Resolve's Dialog Leveler, CapCut's Reduce noise or Adobe's free web enhancer. Blend some original sound back in, raise the level, and test on a phone speaker and earphones.
Key takeaways
- • Steady hum from fans or a UPS is the easiest noise to remove; room echo and background music are the hardest.
- • Use one cleanup tool per clip at moderate strength, then blend a little original sound back in.
- • Audacity is free, and its Residue option lets you hear exactly what the filter removes.
- • Adobe's free Enhance Speech plan cleans audio files up to 30 minutes long, with one hour a day.
- • DaVinci Resolve's Voice Isolation is Studio-only, but the free version has AI Dialog Leveler with background reduction.
Table of contents 13 sections
- What Kind of Noise Is Ruining Your Audio?
- Why Fix Noise Before You Press Record?
- Remove Background Noise From Video: The 7-Step Workflow
- How to Reduce Background Noise in Premiere Pro
- Audacity Noise Reduction: The Free Manual Method
- DaVinci Resolve: Dialog Leveler or Voice Isolation?
- CapCut Reduce Noise for Reels and Shorts
- Adobe Enhance Speech in Your Browser
- Which Noise Removal Tool Should You Use?
- Mistakes That Make Cleaned Audio Sound Worse
- Audio Work Inside PSTA's Video Editing Course
- Where Does Audio Cleanup Earn You Work?
- Clean One Clip Before Your Next Upload
To remove background noise from video, pull out the dialogue, run it through a speech-cleaning tool such as Adobe Enhance Speech, Audacity's Noise Reduction or DaVinci Resolve's Dialog Leveler, then blend a little of the original sound back in so the voice stays natural. You can do all of it free. Audacity costs nothing, and Adobe's free Enhance Speech plan cleans audio files up to 30 minutes long, with one hour of processing a day.
The tool matters less than the order you work in. Most ruined clips I see in class were not too noisy to save. They were cleaned too hard, in the wrong order, with no backup. This guide gives you a repeatable method instead. You'll learn:
- which kinds of noise software can fix and which it can't
- a seven-step cleanup workflow you can use in any editor
- exact menu paths for Premiere Pro, Audacity, DaVinci Resolve, CapCut and Adobe's browser tool
- how to pick a tool based on your budget, your device and the type of noise
- the settings mistakes that make a voice sound watery or robotic
What Kind of Noise Is Ruining Your Audio?
Before you touch a slider, name the problem. Noise in Pakistani recordings usually falls into three groups, and each one responds differently to software.
Steady noise stays the same from start to finish. A ceiling fan, the hum of a UPS, a refrigerator, an AC compressor or the hiss of a cheap microphone all count. This is the easiest kind to remove, because the software can study it and subtract it.
Changing noise comes and goes: a rickshaw passing outside, a pressure horn, children playing in the street, a dog barking, a neighbor's generator starting up. Classic noise reduction struggles here, because the sound keeps changing shape. AI speech tools do better, since they rebuild the voice instead of subtracting a fixed noise pattern.
Room echo is the hollow sound of an empty room with bare walls and a tiled floor. Many new homes and shop interiors here are full of hard surfaces, so echo is common. Noise filters barely touch it. Speech enhancers reduce it, but the cleanest fix is a smaller room with curtains, a carpet or a mattress nearby.
One more category is worth naming: background music playing in a shop or at a wedding. Most speech tools are designed for voice only, and Adobe says its own enhancer is not built for loud background music, singing, whispers or overlapping speakers. Expect partial results at best.
Why Fix Noise Before You Press Record?
Every cleanup tool removes a little of the voice along with the noise. The Audacity team puts it plainly on its noise reduction page: record in the quietest place you can, because software cannot fully make up for poor recording conditions. Two minutes of preparation saves you an hour of repair.
Use the checklist below on every shoot. Most items cost nothing.
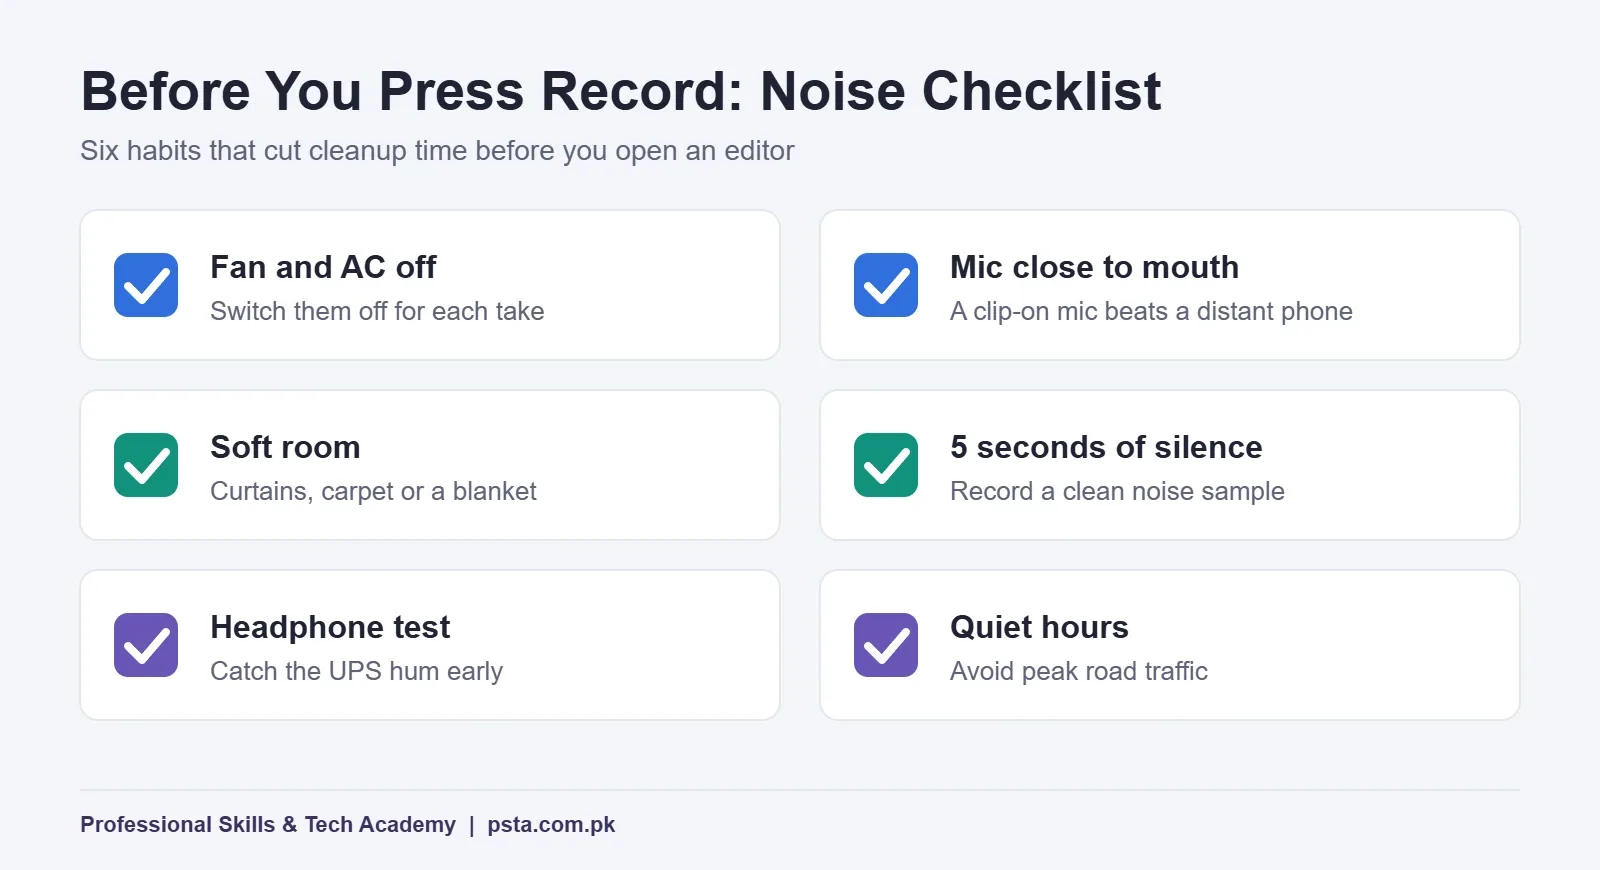
- Switch off the fan and AC for the take, even in summer. Shoot in short segments so the room doesn't overheat.
- Move the mic closer. A clip-on lavalier near the chest beats a phone microphone two meters away. The closer the mic, the louder the voice compared with the noise.
- Soften the room. Hang a blanket, close the curtains or record in a bedroom rather than an empty drawing room.
- Record 5 seconds of silence at the start of each location. That clean noise sample makes manual tools work far better.
- Wear headphones during a test recording. You will hear the UPS hum that your ears ignore in the room.
- Avoid busy hours if you're near a road or market. Early morning is usually quieter.
Remove Background Noise From Video: The 7-Step Workflow
This order works whether you edit on a laptop or a phone. The tool changes from section to section below, but the steps stay the same.
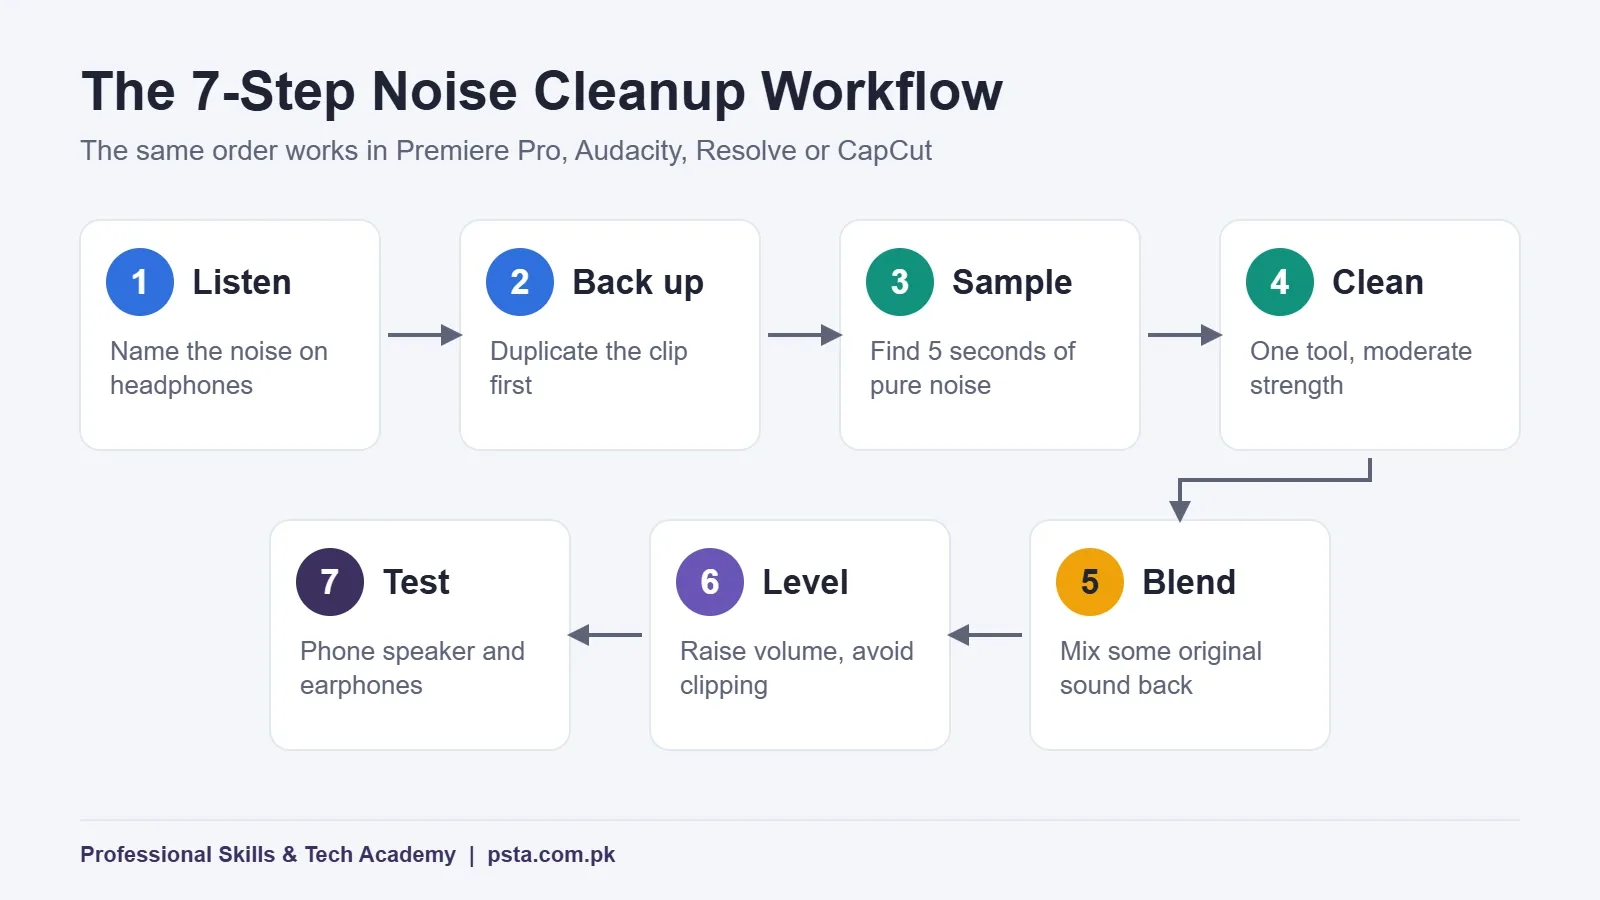
- Listen on headphones and name the noise. Is it steady, changing or echo? That decides your tool.
- Duplicate the clip or keep the original file. Never clean your only copy. If you overdo it, you need a way back.
- Find a noise-only section. Those 5 seconds of silence you recorded are useful here. Manual tools need them; AI tools don't.
- Apply one cleanup tool at moderate strength. Start gentle. You can always add more, but you can't recover detail you removed.
- Blend back some original sound. A tiny amount of room tone makes the voice sound real. Total silence behind a voice sounds fake.
- Balance the level. Cleaned speech often sounds quieter or thinner, so raise the volume and check that loud words don't clip.
- Test on a phone speaker and on earphones. Most of your viewers will hear the video on one of these, not on studio monitors.
Steps 4 and 5 are where most beginners go wrong. The rest of this guide shows how to do them in each popular tool.
How to Reduce Background Noise in Premiere Pro
Premiere Pro's main noise tool is Enhance Speech, the same AI model as Adobe's online tool. Adobe says the Premiere version runs locally on your computer, so you don't need a fast internet connection, which helps a lot during load-shedding or on a weak connection.
- Select the dialogue clip (or clips) on your timeline.
- Open Window > Essential Sound and tag the clip as Dialogue.
- Turn on Enhance Speech, which is off by default, and click Enhance.
- Keep editing while it analyzes. Each clip only needs to be analyzed once.
- Drag the Mix Amount slider down until the voice sounds natural rather than processed.
How much does it help? In a test on Premiere Pro 2025, editor Larry Jordan measured background noise dropping by about 6 dB with no matching drop in the voice. He also points out that noise is reduced, not erased. For a perfectly silent background, the honest answer is to record the line again.
Enhance Speech needs a reasonably capable computer. If your laptop is older, run it on a few clips at a time rather than a full one-hour podcast in one go. Our guide to a laptop for video editing explains which specs matter most.
Audacity Noise Reduction: The Free Manual Method
Audacity is free and open source, with no subscription, and it runs on Windows, macOS and Linux. The current release is Audacity 4.0.2. It does not edit video, so export the audio from your editor as a WAV file, clean it, then import it back and line it up with the original track.
- Select a stretch of pure noise, at least half a second long, with no speech in it.
- Go to Effect > Noise Reduction and click Get Noise Profile.
- Select the whole track with Ctrl+A.
- Open Effect > Noise Reduction again, adjust the three sliders and click Preview.
- Click OK when it sounds right, then export as WAV.
The three sliders confuse most beginners, so here is what each one does, according to the Audacity manual:
| Setting | Default | What it controls | Practical advice |
|---|---|---|---|
| Noise Reduction (dB) | 6 | How far the noise is pushed down | Use the lowest value that makes the noise acceptable |
| Sensitivity | 6 (range 0 to 24) | How much of the sound counts as noise | Raise it only until artifacts disappear |
| Frequency Smoothing (bands) | 6 | Spreads the reduction into nearby frequencies | Higher values tend to suit speech; try 1 to 6 if artifacts remain |
The Audacity team's own feature page suggests a stronger starting point of 12 dB, Sensitivity 6 and Frequency Smoothing 3. My advice: start at the default, preview, and only step up if the hum is still obvious.
Two features are worth knowing. The Residue option lets you hear exactly what's being removed. If you can make out words in the residue, your settings are too strong. And the noise profile is not saved when you close Audacity, so capture a fresh profile for each session and each location.
DaVinci Resolve: Dialog Leveler or Voice Isolation?
DaVinci Resolve gives you two routes, and which one you get depends on your version.
AI Dialog Leveler with Background Reduction works in the free version too. In Larry Jordan's DaVinci Resolve 20 walkthrough, you select a clip, open Inspector > Audio, switch on AI Dialog Leveler and check Background reduction. He prefers the mode that allows wider dynamics, because noise that keeps popping in and out between words is more distracting than a low, steady background.
DaVinci Resolve Voice Isolation is a Studio-only feature. Blackmagic lists it among the DaVinci Neural Engine tools in Resolve Studio 21, a one-time purchase with a list price of $295. Blackmagic was running a discount to $236 until 20 November 2026, so check the current price before you buy. The Amount control defaults to 100, which removes nearly all background sound. Jordan finds 70 to 80 gives a more natural result.
Use one of these on a clip, not both. Stacking two noise tools is the fastest way to a hollow, underwater voice. If you're still deciding between editors, our comparison of Premiere Pro vs DaVinci Resolve covers the wider trade-offs.
CapCut Reduce Noise for Reels and Shorts
If you edit short videos in CapCut, its noise toggle is the quickest option. On the desktop editor, CapCut's own noise reduction guide describes this route:
- Import your video and drag it onto the timeline.
- Select the clip.
- Open the Audio tab in the right-hand panel.
- Switch on Reduce noise and adjust the intensity.
- Export at the resolution you need.
CapCut's features and plans change often, and some tools carry a Pro badge, so check whether the option is marked before you build a client workflow around it. For a 30-second reel shot in a shop, CapCut is often enough. For a 40-minute interview, a laptop editor gives you more control.
Adobe Enhance Speech in Your Browser
Adobe's online Enhance Speech needs no installed software, which makes it useful on a college computer or a borrowed laptop. Export the audio from your video, upload it, download the cleaned file and place it back on your timeline.
According to Adobe's FAQ, the free plan accepts audio files up to 500 MB and 30 minutes each, with one hour a day in total. Direct video upload and bulk upload are Premium features, so free users should upload audio only. It accepts MP3, WAV, M4A, FLAC, OGG and AAC files.
Adobe also describes the tool as language agnostic. In practice, that means Urdu, Pashto or Hindko dialogue is handled the same way as English, since the model is cleaning a voice, not understanding words. It works best on clear speakers and moderate noise, so don't expect miracles from a recording made beside a busy road.
Which Noise Removal Tool Should You Use?
Here's how the five options compare for a beginner in Pakistan. Prices and limits are from the official pages linked above.
| Tool | Cost | Best for | Main limit |
|---|---|---|---|
| Audacity Noise Reduction | Free | Steady hum, fan and UPS noise | Audio only; needs a noise sample |
| Adobe Enhance Speech (web) | Free plan available | Quick fixes without software | 30 minutes per file, 1 hour a day on free |
| CapCut Reduce noise | Check plan badge | Reels and shorts | Little fine control |
| DaVinci Resolve Dialog Leveler | Free version | Long videos on a budget | Gentler than Voice Isolation |
| Premiere Pro Enhance Speech | Adobe subscription | Client work inside Premiere | Needs a capable computer |
If the table still leaves you unsure, follow the decision path below.
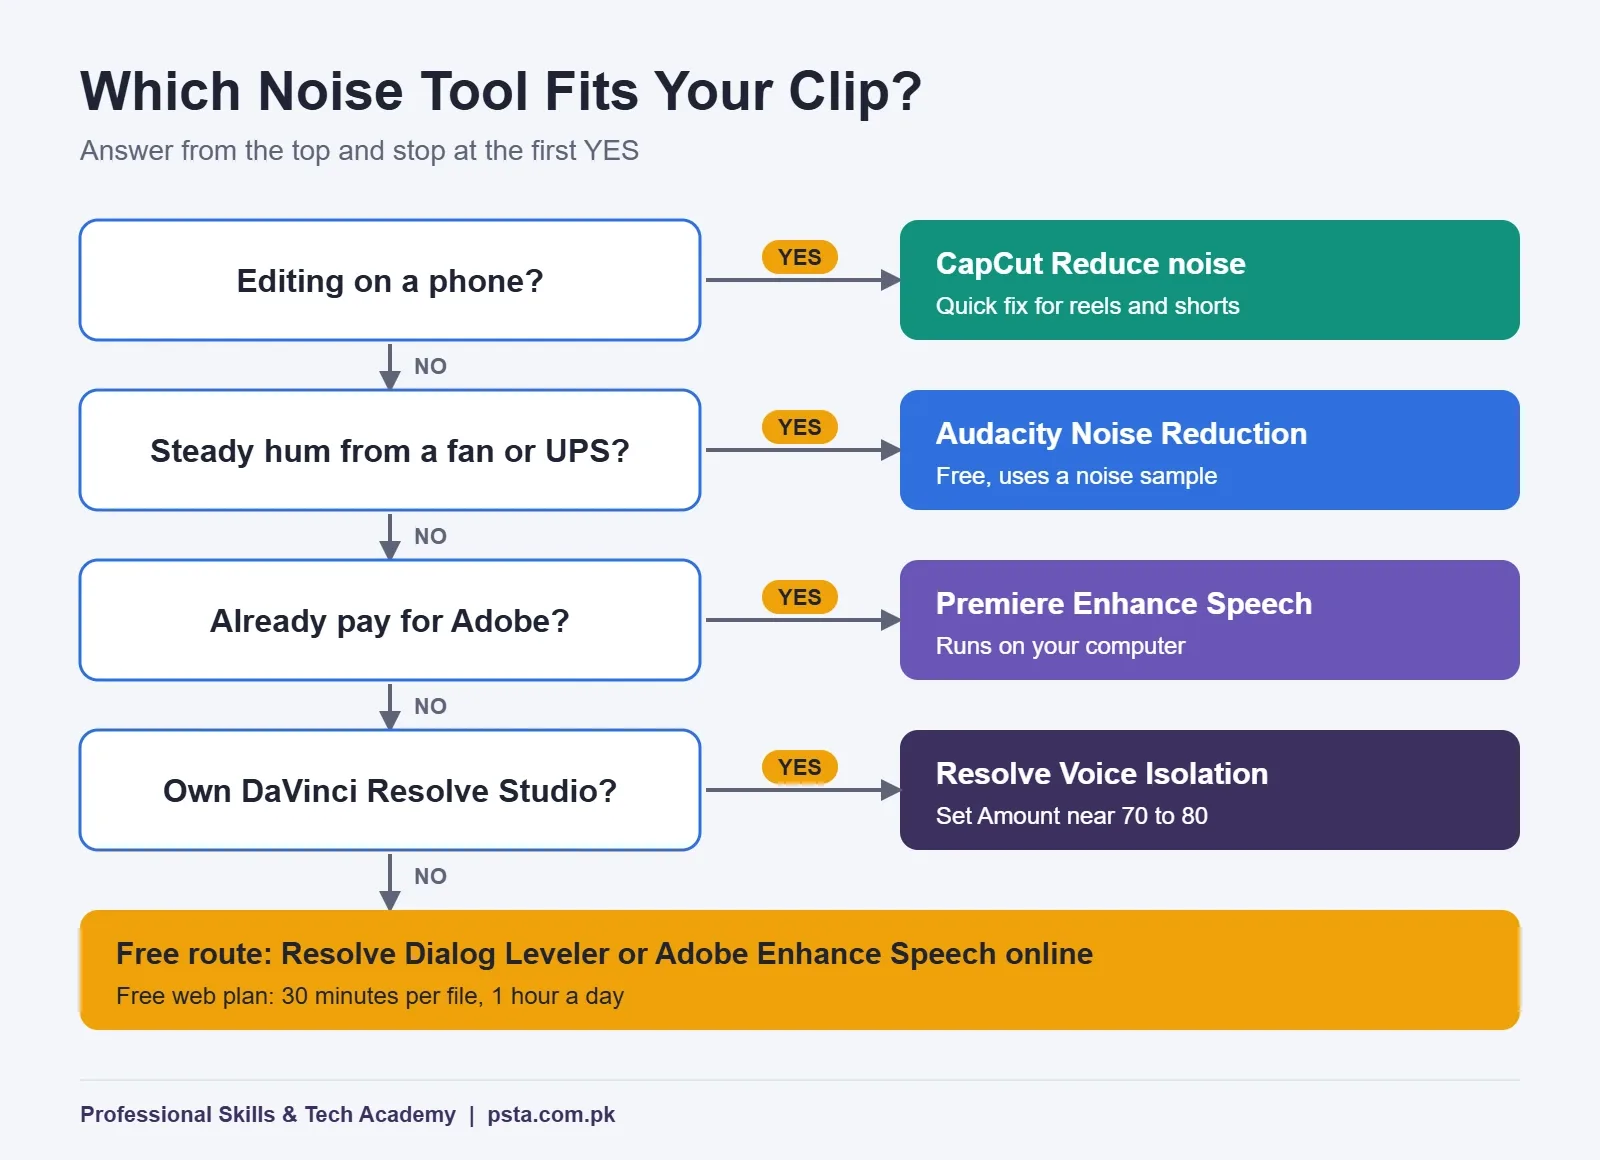
For most students, the strongest free combination is DaVinci Resolve for editing plus Audacity for stubborn hum. Our list of free video editing software covers other editors if Resolve is too heavy for your machine.
Mistakes That Make Cleaned Audio Sound Worse
These are the errors I correct most often when students submit their first interview or vlog edit.
- Running everything at 100%. Full strength removes breaths and room tone along with the noise. The result sounds like a voice floating in a vacuum.
- Stacking tools. Enhance Speech, then a denoiser, then Voice Isolation will chew the voice apart. Choose one.
- Ignoring "musical noise". The Audacity manual describes these short, random tones as artifacts that can sound worse than the original noise. Lower the reduction or raise Sensitivity slightly.
- Cleaning the music track. Speech tools are built for voice. Keep music on its own track and leave it alone.
- Using a noise sample with speech in it. The software then treats parts of the voice as noise and removes them.
- Skipping the final listen. Cleaned audio can sound fine on laptop speakers and harsh on earphones. Check both before you export with the right export settings for YouTube.
Audio Work Inside PSTA's Video Editing Course
Sound gets a full module in our Mastering Video Editing & Visual Effects (VFX) course: sound design, audio mixing and background score work in Premiere Pro, alongside color grading, green screen and After Effects. It's a 12-week, beginner-level program. The current fee listed on the course page is Rs. 22,000 (regular Rs. 25,000), payable in two installments.
You can join at our Abbottabad campus in Mandian, on Old College Road opposite FIMS College, or attend the same live classes online from anywhere in Pakistan. Online sessions are recorded, which helps when you want to replay an audio lesson and copy the settings exactly. If you make reels for brands, the Social Media Marketing & Meta Ads course pairs well with it.
Where Does Audio Cleanup Earn You Work?
Clean sound is one of the first things clients notice, even if they can't explain why a video feels cheap. Local businesses film product reels in noisy markets, wedding videographers record speeches over generators, and podcasters record in untreated rooms. An editor who knows how to remove background noise from video saves that client a reshoot.
If you freelance, list audio cleanup as part of your editing service rather than a hidden extra. Show a short before-and-after sample in your portfolio: ten seconds of raw audio, then the same ten seconds cleaned. It proves your skill faster than any description. If editing terms like room tone or clipping are new to you, our video editing terms for beginners explains them in plain words.
See every program on our courses page, read how enrollment works on the admission page, or ask about batch timings on WhatsApp at +92 314 5424399.
Clean One Clip Before Your Next Upload
Pick the noisiest clip from your last video. Duplicate it, run one tool at moderate strength, blend some original sound back in, and compare the two on earphones. Write down the settings that worked. After three or four clips, you'll have your own starting preset, and noise will stop being the reason you delay publishing.
Frequently asked questions
Can I remove background noise from a video for free?
Yes. Audacity is free and open source, so you can export your video's audio as a WAV file, clean it with Noise Reduction and bring it back. DaVinci Resolve's free version includes AI Dialog Leveler with background reduction, and Adobe's web Enhance Speech has a free plan that takes audio files up to 30 minutes long, with one hour a day.
Does AI noise removal work on Urdu or Pashto speech?
Adobe describes its Enhance Speech tool as language agnostic, which means it cleans the voice without needing to understand the words. Urdu, Pashto, Hindko or Punjabi dialogue should be treated the same way as English. Results depend far more on how clearly the speaker was recorded and how loud the background noise is than on the language spoken.
Can I remove background music from a recorded speech?
Only partly. Speech enhancers are built for voice, and Adobe says its own tool does not work well with loud background music or singing. A light music bed behind a speaker may drop noticeably, but a wedding speech recorded next to a sound system will still carry traces. If the music matters, ask the client for a separate audio recording.
Why does my voice sound robotic after noise reduction?
The settings are too strong, or two noise tools are stacked on the same clip. Lower the reduction amount, use only one tool, and blend some of the original audio back in with a mix or amount control. In Audacity, listen to the Residue option; if you can hear words in what is being removed, back the settings off.
Should I clean audio on my phone or on a laptop?
For a short reel, a phone editor such as CapCut is often enough. For interviews, podcasts, client work or anything longer than a few minutes, a laptop gives you finer control, waveform views and the option to compare versions side by side. Many editors shoot on a phone and do the audio cleanup on a laptop later.
Can wind noise be removed from outdoor video?
Software can reduce wind rumble, but strong gusts that hit the microphone directly usually leave damage that cleanup tools can't fully repair. Prevention works better. Use a foam or furry windscreen on the mic, shield it with your body, and record a short test outdoors before the real take. Then clean what remains with one gentle pass.
When should I clean the audio during an edit?
Clean the dialogue clips once your rough cut is settled, but before you add music and final level adjustments. That way you aren't processing footage you later delete, and your music and loudness decisions are made on top of clean speech. Always keep an untouched copy of the original audio in case you need to redo the cleanup.
Sources & references
- Adobe Help: Frequently asked questions about Enhance Speech helpx.adobe.com
- Adobe Community: Enhance Speech in Premiere Pro announcement community.adobe.com
- Larry Jordan: How to Reduce Background Noise in Adobe Premiere Pro 2025 larryjordan.com
- Audacity Manual: Noise Reduction manual.audacityteam.org
- Audacity: How to remove background noise audacityteam.org
- Larry Jordan: How to Reduce Background Noise Using DaVinci Resolve 20 larryjordan.com
- Blackmagic Design: DaVinci Resolve Studio blackmagicdesign.com
- CapCut: Mastering Audio, A Guide to Noise Reduction capcut.com
Last reviewed & updated on by Umar Qureshi. Written by the PSTA team in Abbottabad, Pakistan.

Umar Qureshi

Mastering Video Editing & Visual Effects (VFX)
Turn this guide into a career: hands-on training with real projects, online across Pakistan or on-campus in Abbottabad · 12 Weeks.

Comments
No comments yet — ask a question or share your experience.